You have no items to compare.
Welcome to DIY Sound Group

Details
This product is for FINALIZING the Elusive 1099 that you already preordered. It is ONLY available for those who preordered and prepaid the $225 downpayment and now need to pay the final $240.
*** UPDATED NOTE ***- If you did not preorder the 1099 then you can **NOT** purchase this product. If you did not preorder and you still buy this product I will refund your order MINUS the Paypal fees because Paypal no longer refunds their fees for cancelled orders. This happens a lot and I can no longer lose $30 for incorrect orders that have to be cancelled.
IMPORTANT:
- The 1099 cost is $465 ($13 cheaper than 2023). You preordered and prepaid $225. The remaining cost is $240 per speaker.
- If you didn't order a circuit board with your original preorder, you can still do that now.
- If you need the flat packs you can order them now.
- As mentioned on the 1099 page, I have $35 added to each kit to cover "free shipping". If you live on the west coast your shipping cost might be a little more due to FedEx shipping rates.
- After you order you should get an email confirmation. If not, check your spam folder and mark it as 'Not Spam' so the future eshipping confirmation doesn't also go to your spam folder.
- Please keep in mind that I have all the parts here but still need to finalize packaging and ship everything. It's time consuming but I'll work through them as fast as possible.
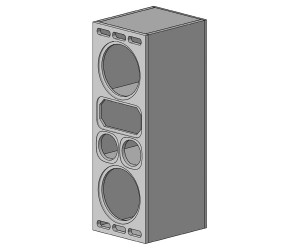
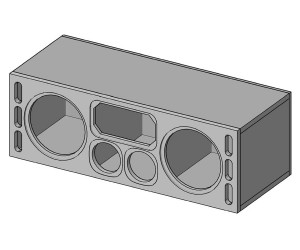
NOTE: With any speaker, if you have space for 3 matching vertical left, right, and center speakers up front, this is always the best way to go. If you have an acoustically transparent screen, you would want to use 3 vertical speakers up front, not a horizontal center. Horizontal centers are only used when you can't fit a taller speaker under your screen.
The Elusive 1099 has gained a cult following since it hit the DIY scene many years ago. '1099' refers to the 10" woofers and the high sensitivity of 99db (2.83V/1m). Keeping parts in stock for this speaker was difficult, which is how it received the 'Elusive' name. And custom 10" black coned woofers for this speaker had to be manufactured by Eminence and the Celestion midranges are special ordered from the UK. Most people wanted the front baffles without roundovers, so I'm no longer getting them made with roundovers and they all have square edges.
Click here for the original design thread on the AVS Forum.
Click here for consolidated build information.
Product Highlights:
- Great for use behind acoustically transparent theater screens.
- Matching horizontal center channel option.
- Low distortion and crisp midrange makes vocals pop during movies.
- Easy to power speaker with a true 99db 2.83v/meter sensitivity.
- Quality name brand components.
- SEOS waveguide gives you a larger 'sweet spot'.
- Will handle over 600 watts and play over 120db.
- Designed to work best when paired with a subwoofer system.
![]()
Minimum order is 2 speakers unless you are getting the center channel: Kits are sold as full kits, sorry no substitutions or subtractions. Don't forget binding posts, terminal cups, or speaker spikes if you need them because they can be shipped for free with any kit or flat pack purchase.
Shipping Note: Most speaker kits currently ship for free, but flat packs normally do not. We try to get your order packaged and shipped in 5-8 days depending on how many orders have come in. Please read the 'Frequently Asked Questions' section for more information.
- Be the first to review this product
Write Your Own Review
Image not uploaded yet
| Speaker Kit Information |
| Model: | The Elusive 1099 |
| Designer: | Ryan Bouma |
| Frequency Response: | 50hz - 20khz (+/-3db) |
| Power Range: | 10 - 600 watts |
| Sensitivity: | 99db - 2.83v/1m |
| Impedance: | 8 Ohm |
| Tweeter: | Denovo Audio |
| Midrange * 2: | 5" Celestion T5306AWP |
| Woofer * 2: | Custom Eminence 10" |
| Enclosure Type: | Ported |
| Dimensions: | 12.5" W x 36.25" H x 14.5" D |
| Kit weight (no cabinet): | About 36 pounds |
| Assembled weight: | About 70 pounds |
Price Break Down:
Specific 1099 Assembly Notes:
Your enclosure should be built with 3/4"" thick material and the included 3/4" thick baffle to the dimensions listed under the specifications tab. You should have two solid horizontal panels equally spaced inside the cabinet to divide the center channel into it's own compartment sealed from the woofers. It is recommended that you loosely fill the speaker enclosure with polyfill and make sure it's not blocking the ports, or line the walls with 1" - 1.5" acoustic foam. Your sealed midrange chamber should be heavily filled with polyfill, fiberglass insulation, or denim insulation. Your crossover should be installed in the sealed midrange chamber. You'll need to drill small holes from the midrange chamber to each woofer chamber so you can run the wires to hook up the woofers. Be sure to seal those small holes back up with hot melt glue or caulking so your midrange chamber is air tight. Please be sure to read the general tips below before starting your build.
Recommended Tools and Supplies:
- Quality wood glue like TiteBond.
- At least 3 clamps 18" wide or bigger.
- Soldering Iron and solder unless there is an optional assembled crossover for your kit.
- Wire cutters
- Screwdriver
- Drill to predrill all screw holes.
- Sanding block or power sander.
- About 6' of speaker wire to connect your woofers and tweeter to the crossover board.
General Tips:
Crossover Assembly:
- VERY IMPORTANT - Inductors are the parts that look like small rolls of copper wire. Notice that the two ends of wire are silver and have been 'tinned' with solder. Those are the parts of the inductor that you should be soldering to, so don't cut it off to get to the copper colored portion. Inductors should not be installed directly next to each other on your board.
- None of the crossover parts have a positive or negative side so it doesn't matter which way they are facing when you assemble your crossover. 16-18 gauge wire is thick enough to use for your crossover or to go from your crossover board to the woofer or tweeter.
- Your crossover can be assembled on a thin piece of MDF or pegboard if the kit doesn't come with a circuit board.
- It doesn't matter where you put the crossover inside your speaker. You could mount it on the outside if you wanted to.
- Normally you wire red wires to positive and black wires to negative. If (and only if) your crossover schemtaic has a note saying 'Inverted Polarity', that means you need to connect the negative from the crossover to the positive on the tweeter and positive from the crossover to the negative on the tweeter. This is only done on some tweeters, not woofers.
- Click Here for a good assembly video by Matt Grant.
Screws and Gaskets:
- Predrill all screw holes with a bit that's slightly smaller than your screws to prevent the wood from splitting. Most screws are #8 panhead and you can use a 7/64" or 1/8" drill bit. Overnight Sensations use a #6 panhead so you can use a 3/32" bit.
- VERY IMPORTANT: Protect your woofer or tweeter when installing screws because you don't want the screwdriver to slip and puncture one of your components....that will ruin your day! Consider putting your free hand next to the screw to cover up the edge of the woofer or tweeter.
- If your kit comes with gasket tape, it should be applied to the back of the waveguide. Peel the paper off the back to expose the sticky side and slowly work it around the perimeter on the back side of the part. Some woofers will need gasket tape as well.
Stuffing or Lining the Speaker Cabinet:
- If your speaker or subwoofer is a sealed cabinet, most designers recommend that you lightly fill the inside with polyfill (pillow stuffing). If you don't have polyfill, then you can line the walls with 1" - 1.5" thick light weight open cell foam (like acoustic foam) or fiberglass insulation. You can also use 2-3" recyled denim insulation that can be bought at Home Depot.
- It's okay to cover up your crossover with the polyfill, insulation, or foam.
- If you're using a ported enclosure you should lightly fill the cabinet with polyfill and be sure not to block the ports. If you do not have polyfill then line the walls with 1" - 1.5" thick open cell foam (like acoustic foam), 2" - 3" of denim insulation, or 2" - 3" thick poly batting.
- Some of the speaker designers like to lines the walls of their ported enclosures with a 1" - 1.5" acoustic foam, and then lightly fill the remainder of the cabinet with polyfill. If this is a required method, it will be listed at the top of the page under 'Assembly Notes'.
Links to Build Threads for this Speaker:
Frequently Asked Questions:
* Do I need to cut the port to a certain length on the ported version? Answer: No, use them at full length.
* Do I need a double thick front baffle layer for these? Answer: No, that's not necessary for this design.
* Does this kit come with a circuit board to assemble the crossover on? Answer: No, most people assemble them on a small thin piece of wood or you can buy the circuit board.
* Do I need to use a subwoofer with these? Answer: Yes, these were designed to be used with a subwoofer. You'll need a large subwoofer to keep up with these.
* Where should I put the assembled crossover? Answer: The crossover should go inside the midrange chamber.
Also Purchased